Pages

Showing posts with label Main Dinner. Show all posts

Wednesday, April 23, 2014

Roasted Eggplant with Tomato, Mozzarella and Basil

This blog has moved to a different site.  To get more great recipes and see new post, go to cookingwithbrittany.com


Tonight was one of those nights were I just felt like going to the store and picking out whatever called out to me, as long as it wasn't mushrooms, zucchini, green beans or asparagus

....As I have had an over abundant amount of these things in the past two weeks and needed a change of pace!

So I got a multitude of different ingredients, from eggplant, tomatoes, mozzarella and basil like the title suggests to leeks, lemons, Brussels sprouts, and tilapia.  And so the ideas began to swarm.

I needed something different, desperately.


I have made eggplant fries before.  They are completey delicious and have resulted in one of my best food memories, though that is best left for a different post (one that has to do with the eggplant fries). 

So this seemed like the complete opposite of that and something different to do with eggplant.  You can look at it as a spin on eggplant pizzas or a spin on caprese salad or you can simply look at it as a deliciously yummy way to serve eggplants.

Enjoy.

Roasted Eggplant with Tomato, Mozzarella and Basil
Serves: 4
Ingredients:
1 large eggplant, sliced lengthwise- 1/2 inch thick
2 Roma tomatoes, thinly sliced
2 cloves garlic, minced
3 sprigs thyme, leaves removed
1/2 cup fresh mozzarella, pearl or torn into smaller pieces
2 tbsp. olive oil
2 tbsp. balsamic vinegar
Kosher salt
Freshly ground black pepper.

Directions:
1.  Place the sliced eggplant, on a parchment-lined baking sheet.  Drizzle with olive oil, and season with salt and black pepper.
2.  Sprinkle with minced garlic and thyme, and layer with sliced Roma tomatoes.  Top with  mozzarella and drizzle with balsamic vinegar.
3.  Bake at 400 degrees F for 20-30 minutes or until eggplant is soft and cheese is golden brown

Sunday, April 13, 2014

Mushroom-Swiss Grilled Cheese


Went on a mushroom kick last weekend.  There's something fun and exciting to me about spending the day in the kitchen with the windows open letting in the much awaited warmer weather.  So that's how I spent my Saturday, while trying out recipes to get through the pounds of mushrooms that I had at home.

I made loads of different things, but this might just be one of my favorites...and I didn't even make it when I was doing all the mushroom cooking.  It was the next day.  I was looking for something quick and easy to do for lunch the day after and still had just a few baby Portobello mushrooms leftover so I figured I would go with that.  Throw in some leftover cheeses, Venison breakfast sausage I had already browned the morning, slices of whole-wheat baguette and you've got yourself the makings of a nice little grilled cheese sandwich.


Did I say butter?  To me the butter on the grilled cheese has always been the forgotten part.  But why?   Can't we find a way to make the butter more than just a means to toast bread and melt cheese, can we make the butter another flavor compontent?  Well of course we can, little bit of minced rosemary and roasted garlic cloves and we have ourselves and Rosemary-Garlic Compound Butter.
Now with that idea, it was time to grill them up.


The Venison breakfast sausage is optional, I did half with and half without when I made these for lunch.  If your going to use it I would suggest using a different bread than a baguette so you have more surface area.  With the baguette slices,  everything gets piled so high, that I had a hard time keeping the sausage on it before I grilled it. 
Of course I missed posting this on National Grilled Cheese Day, which was yesterday (April 12).  However at least I was still ahead of the game on making it a week in advance.  Here's to next time actually being on time and meeting my own deadlines.
Enjoy.

Mushroom-Swiss Grilled Cheese
Makes: 4 sandwiches
Ingredients:
Whole-wheat baguette, cut on the bias into 1/2 inch thick slices
4 slices Swiss cheese, cut in half
1 cup shredded parmesan cheese
1 package baby Portobello mushrooms, thinly sliced
8 oz. Venison breakfast sausage, cooked and crumbled (optional)
1 tbsp. fresh thyme leaves, minced
1 tbsp. olive oil
4 oz. butter, softened
6 cloves roasted garlic
1 sprig rosemary, leaves removed and minced
****Most of the amounts given are a guesstimation, make them with the amounts you prefer.  If your more of a cheese fan and just want a hint of mushroom lower the amount of mushroom you use and vise versa if your more of a mushroom fan.  

Directions:
1.  Start with making your compound butter.   Using a small bowl mix together the softened butter, roasted garlic, minced rosemary and a pinch of salt until fully combined.  (My roasted garlic just blended right in, but you might want to mince it down a little if you want to make it easier to incorporate.)  Set aside until ready to use.
2.  Using a medium sauté pan, heat olive oil over medium-high heat.  Add in mushrooms and sauté until softened, about 10 minutes.  Remove from heat and set aside.
3.  Assemble:  Butter one side of 8 baguette slices, set 4 to the side and using the remaining 4 place buttered side down.  Top these slices with 1/2 slice of Swiss cheese and a sprinkle of parmesan cheese.  Top with sautéed mushrooms, minced thyme, and then the sausage (optional).  Top with the remaining Parmesan cheese and the last of the Swiss cheese.  Top with the 4 remaining bread slices, buttered side up.
4.  Using a large nonstick skillet or griddle, heat over medium heat.  When ready, place your sandwich in pan.  Cook until brown, about 1-2 minutes and then flip carefully to brown the other side.   While cooking, using your spatula apply some pressure on the sandwich squashing it just slightly to make sure the top layer and bottom layer of cheese bond together when melting.  Cooking until brown and cheese is melted, 1-2 minutes then remove from heat.


Tuesday, April 8, 2014

Smoked BBQ Spice Rubbed Pork Shoulder


It’s finally started to warm up, and when I have been able to sit outside and work on the laptop (like I am right now) two days in a row without my winter jacket on then I am officially calling it.  Spring is here!

Of course, now that I’ve said it, we’ll end up with a blizzard or something next week just to make me eat my words.  But if all goes well, it should hopefully remain like it is and slowly get warmer (bring on the heat and humidity!)

However, when I think spring and the beginning of warm weather, I start to get really excited about grilling.  And since this is the first spring arrival I am experiencing after getting my very own smoker I am starting to get giddy about that too.

 
I grew up with my summer weekends being filled with cookouts with my family and enjoying my time outside.  And one of the more special things that my father would do is pull out his smoker and spend a whole day smoking various meats while working in the garden with my mom.  We’re lucky enough to have a big cherry tree in my parents’ back yard, so whenever my dad was trimming branches he would always save them and trim the branches into smaller sizes and then soak those in water before beginning the smoking process. 

Smoking meat is a low and slow kind of thing, and you need to be around to tend to it by adding in more wood chips or charcoal throughout the process, so because of this he wouldn’t usually pull out the smoker as often as the grill.  But when he did, he would go all out.  Pork butts, chicken, turkey, ribs, and fish would all go on the smoker at some point in the day (depending on the amount of time needed).  Then we would usually have one of those items for dinner (usually the ribs) and he would freeze the rest, that way he would still get to enjoy that deep smoky flavor in-between “smoke days” without all the work.

 
On my very first solo smoke day (after finally getting a smoker for Christmas and then bags of wood chips, charcoal and lighter fluid for my birthday, from my dad naturally) I decided to stick with pork.  There is just something about pork and smoking and/or barbequing that just goes together so well.  I had already been working on different spice rubs, and I wanted to do one that had the flavor of a barbeque sauce, just without the sauce.  This was inspired by the fact that my dad always smoked a pork butt/shoulder and would then use it the next day as barbeque pulled pork by cooking in the in the crock pot with his favorite barbeque sauce.  So I wanted those flavors, but in a pork loin and not pulled. 

And I got it!  After numerous tries with the rub, I finally got the right balance of sweet and spicy and then the smoky flavor from smoking the pork all day.  It was delicious cut in slices by itself.  It was great the next day sliced for cold sandwiches.  When I say my kind of barbeque this is it and I just can’t wait to get back to my smoker this year…it has been missed.

Enjoy!
 
Barbeque Spice Rub
Makes: approx. 1 1/2 cup
Ingredients:
2 tbsp. salt
4 tbsp. granulated sugar
4 tbsp. brown sugar
1 tbsp. garlic powder
1 tbsp. onion powder
1 tbsp. paprika
1 1/2 tbsp. chili powder
1 tbsp. ancho chili powder
1 tbsp. ground black pepper
1 tbsp. cayenne pepper
1 tbsp. ground thyme
1/2 tbsp. rosemary
1 tbsp. ground cumin
1/2 tbsp. nutmeg
1/4 tbsp. allspice

Directions:
1.  Mix all of the ingredients together in a bowl.

Wednesday, March 12, 2014

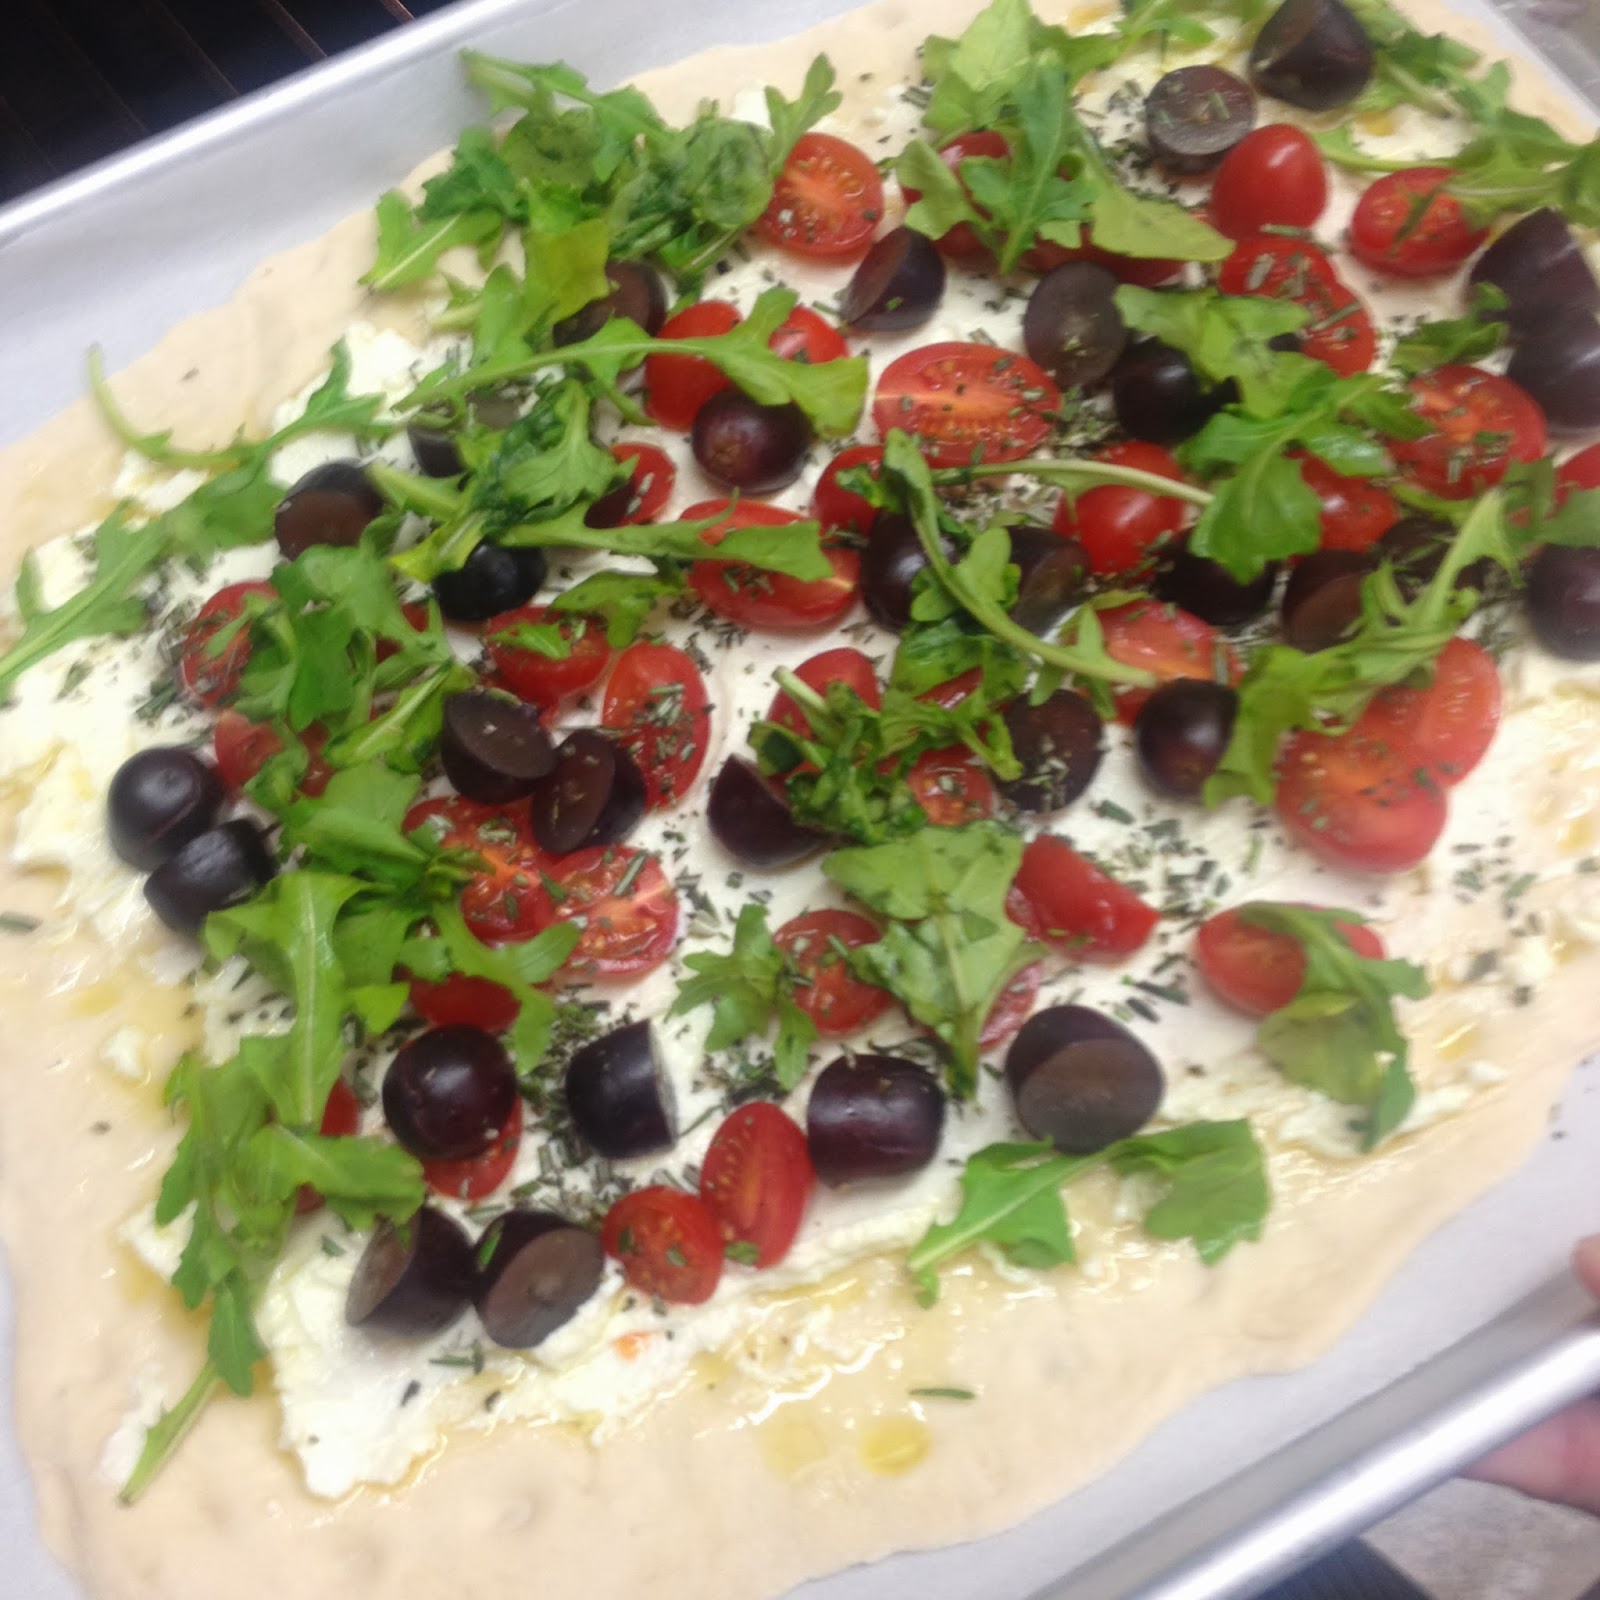
Cherry Tomato and Grape Flatbread


Recently I decided to try and find some fun and different ways to make flatbreads or pizza besides your traditional pizza sauce and meat and/or veggie toppings.  Not that a don't love a good homemade slice of pepperoni pizza, I do.  But I love exploring with different sauces and toppings and combinations.  After searching a little I found a lot of different roasted tomato flatbreads recipes, so I decided to take that idea and adapt it slightly with different herbs and by adding some other ingredients...like grapes.

GRAPES?? I know, I know, it sounds a little strange.  But growing up I remember my dad letting me make grape kebobs and cooking them on the grill like any other kebob and I just remember being so surprised by how yummy it was.  It was just this really warm pleasant flavor that I have always enjoyed and wanted to incorporate into a dish.

So give it a try...if you really don't want to add the grapes you don't have too (I'm all about making recipes your own) but I urge you to give this little surprise a try!
Enjoy.

Cherry Tomato and Grape Flatbread
Serves:3-4 (1 flatbread)
Ingredients:
Flatbread dough (homemade or store bought)
Extra virgin olive oil
4 oz. ricotta cheese
1 cup cherry tomatoes, halved
1 cup wine grapes, rinsed and halved
3 sprigs rosemary, minced
2 sprigs oregano, minced
1 sprig thyme, minced
Kosher salt
1 cup arugula
Directions:
1.  Preheat the oven to 400 degrees F.  Line baking sheets with parchment and sprinkle with flour.
2.  Roll out the dough into a loose rectangle, about 1/4 inch thick.  Transfer this to the prepared baking sheet.
3.  Dot the dough using your finger, making small indents in it.  Brush with extra virgin olive oil.  Spread the ricotta on the surface and then scatter the tomatoes and grapes over the top of that.  Sprinkle with the rosemary, thyme, oregano and salt to taste.
5.  Bake until the crust is golden and the topping nicely charred, about 25-30 minutes.  Top with fresh arugula.


**This picture is from the class I taught, which is why the arugula looks cooked they placed in on the flatbread before baking.  As soon as I get a chance I will be adding new updated pictures, just wanted to share as soon as I could!

Want more recipes, food info, and pictures more often?  Then follow me on Facebook!  Click then link below to check out my Facebook page.
Brittany M on Facebook at: Cooking with Brittany

Saturday, February 15, 2014

Fettuccine Alfredo

 
Finally back with a blog post.  Keeping up with the pasta theme that I had going, I made 
Fettuccine Alfredo.  And on National Fettuccine Alfredo Day no less!  Talk about great timing (great timing when I made it, which was last Friday-week late sharing). Fettuccine Alfredo is traditionally made with cheese and butter, these two items together form an emulsification when the cheese begins to melt.  Now, once Fettuccine Alfredo gained popularity in the United States and over the years the dish has changed slightly, but the idea is still the same. 
 
 
In an attempt to make the dish cost less, over the years there have been many variations done to the traditional butter and cheese sauce.  Cheaper cheeses were used, cream added, flour used as a thickener; we've seen ingredients added such as broccoli, chicken, shrimp, or any other combination.  The popularized American version is usually made with cream added to the butter and cheese mixture.  And luckily with an increasing availability to Italian cheeses were starting to shy away from the powdery cheaper parmesan cheese and indulging in Parmigiano-Reggiano. 
 
 
 Next time your at the grocery go ahead and skip the jarred Alfredo sauce and give this creamy pasta dish a try.  Find a day and bust out your rolling pin, pasta roller or trusty bottle of wine and get your Fresh Pasta Dough made and try out this Fettuccine Alfredo you'll be happy you did.  You know, grab the wine anyway-whether you use it or not when your all done pour yourself a glass (or two) and enjoy. 


Fettuccine Alfredo
Ingredients:
1 pound dried fettuccine or Fresh Pasta
6 tbsp. butter
1 shallot, minced
4 garlic cloves, minced
2 cups heavy cream
1/2 cup grated Parmigiano-Reggiano
Kosher salt
Freshly ground black pepper
Parsley to garnish
 
Directions:
1.  Cook the fettuccine in a heavily salted pot of boiling water.  Cook until the pasta is al dente and then drain.  Reserve some of the cooking liquid for later use.
2.  Meanwhile, melt the butter in a saucepan over medium-high heat.  And in the garlic and shallots and sauté until tender and aromatic.  Add the heavy cream and bring to a boil.  Cook about 5 more minutes, until your sauce has reduced slightly.
3.  Add your cooked pasta to the sauce and top with cheese and toss to coat.  If your mixture get to thick, add in your reserve cooking liquid to help loosen it up.  Season with salt and pepper to taste. 
4.  Top with parsley and more cheese if desired and serve immediately.


Friday, January 31, 2014

Roasted Tomato Sauce


 These cold winter months are making me dearly miss spring and summer.  I am a HUGE summer fan; I love spring just because it leads to summer.  I dislike fall because it leads to winter (I won’t use hate because there are too many other good things about fall that I love that overrides the weather).  So I have spent today, which has been a cold and very windy day dreaming about my favorite seasons.  Lounging around planning our vegetable and herb gardens in my head and ways to improve some of last year’s first round attempts. 


Which got me thinking about the fact that we crazily thought we could plant 21 tomato plants in our part-sun backyard.  Again, first time gardeners here, and tomatoes weren’t the only thing we went over the top with, I’m not even going to mention the peppers.  I don’t think I have to say more, we were overambitious.  Anyway, though we sadly didn’t have a lot of luck with this we did still get a decent amount of our Roma tomatoes to grow (the peppers did pretty well also).  The whole idea behind the garden and overabundant amount of tomatoes and peppers was so we could make our own tomato sauces and salsas to freeze and/or can. 


So with the little amount of tomatoes we did get I was determined to make the tomato sauce at least once.  I think there is something so wrong about the fact that all growing up I thought that tomato sauce was supposed to be red, I mean tomatoes are red who was I to question this.  But then I made this; slow roasted tomatoes with onions and garlic, flavored with thyme and oregano.  And well what do you know, it’s orange.  Not your bright crazy orange by any means but that beautiful tomatoe-y orange I’ve come to recognize, know and love about tomato sauce. 


This is one of those recipes that will always be in the works until I think I have perfected it. Then of course I’ll start tweaking it again trying to make sure it’s just right.  So, this is where I am at with the recipe currently, which I still love.  I served this with homemade pasta tossed in parmesan and chopped parsley to garnish.  Now all we need is some garlicky bread goodness to go along with this and a glass of our favorite wine and we’re good.  J Enjoy

Roasted Tomato Sauce
Makes 4 cups

Ingredients:
20 Roma tomatoes, halved and seeded (you can use other tomatoes if need be)
1/4 cup extra virgin olive oil
1 tsp. kosher salt
1 tsp. freshly ground black pepper
1 large onion, cut into wedges
6-8 whole garlic cloves
1 bunch thyme, leaves removed
1 bunch oregano, leaves removed

Directions:
1.  Preheat oven to 325 degrees F.
2.  In pan place tomato halves cut side up.  Sprinkle generously with olive oil, salt and black pepper.  Top with onion wedges, garlic cloves and herbs.  Bake tomatoes for 2 hours.  Check to make sure your onions and garlic aren't cooking too quickly after about an hour.
3.  After the 2 hour mark, bump your oven up to 400 degrees F and cook for an additional 20 to 30 minutes.
4.  After that remove from the oven.  Using a food processor, add all of your roasted ingredients and blend until smooth.

Wednesday, January 29, 2014

Wild Mushroom Ragu


What kind of woman would I be if I didn't like mushrooms?  I love them!  I look at my brother, who is not a mushroom lover in the least and I judge him for it-I mean seriously I'm not sure we're related at all anymore.  But putting his bad food decisions aside, I love this dish because it is literally jam packed with mushrooms and flavor. 

Though this is not a traditional ragu in the sense that there isn't any meat at all.  It does mimic the technics that go with a ragu.  Traditionally, ragu is a meat based sauce, it is usually cooked slowly by braising or stewing.  It can be done with any type of meat,  with an assortment of different vegetables added to it.  As well as numerous different stocks and/or liquids that can be added to cook the meat.


This has the same concept with the fresh mushrooms being braised slowly in a mushroom stock made from dried mushrooms that has an aroma to die for.  This particular recipe does also have chicken stock added in, however if you were wanting to omit that you could just up the amount of mushroom stock you use and leave out the chicken stock all together. 

Otherwise enjoy!  The only other thing to make this better would be fresh homemade pasta to serve this over.  Which we did do in my Pasta and Sauces class last night, but of course I missed out on getting a picture in time before it was all gone.  So your stuck with my home version I made with whole wheat linguine-still delicious.  But stay tuned, I have pasta dough I made earlier and left over Roasted Tomato Sauce from last night so I'm thinking that recipe sharing two yummy sauces is a good way to celebrate this hump day!

Wild Mushroom Ragu
4-6 serving


Ingredients
1 cup dried mushrooms (I usually grab the assorted mushroom medley, but porcini, shiitake or many of the others would work fine as well.
Extra virgin olive oil
1 onion, cut in small dice
2 tsp. crushed red pepper flakes
Kosher salt
4 cloves garlic, minced
2 pounds assorted fresh mushrooms (porcini, shiitake, oyster, baby Portobello and/or cremini); trimmed, cleaned and cut into bite-sixed pieces)
1 cup dry white wine
1 cup chicken stock
1 tbsp. thyme leaves
3 bay leaves

Directions
1.  Soak the porcini in 3 1/2 cup of hot water, until very soft, about 30 minutes.
2.  Coat a large wide saucepan generously with olive oil and bring to medium-high heat.  Add the onion and red pepper flakes and season with salt; cook until the onion is soft and aromatic, 8 to 10 minutes.  Add the garlic and cook for 2 to 3 minutes or until it starts to become aromatic.
3.  Add the fresh mushrooms, season with salt and sauté until soft, 8 to 10 minutes.  Add the wine and continue cooking until reduced by half, roughly 5 minutes.
4.  Using a slotted spoon, scoop the mushrooms out of the soaking water (that has now become your mushrooms stock).  Be careful to try not to stir up the stock too much, much of the crummy stuff and dirt that was on the dried mushrooms that you don't want has settled on the bottom of your pan, try and leave that is undisturbed as possible.  Put the mushrooms in a food processor, ladle in about 1/2 cup of the soaking liquid (mushroom stock), and puree to a very smooth paste.
5.  Add the mushroom paste, 2 to 2 1/2 cups of the mushroom stock and 1 cup of the chicken stock to the pan; toss in the thyme and bay leaf.  Taste and season with salt if needed.  Bring the liquid to a boil and reduce to a simmer.  Simmer for 25 to 30 minutes, adding more stock if needed; this sauce should be saucy but not soupy.  Remove the bay leaves before serving.


Wednesday, January 15, 2014

Braised Chicken and Brussels Sprouts


     In preparing for a party this weekend, I have spent the vast majority of today prepping some of the ingredients and doing a start up on some of the cooking.  In doing this, I some how let dinner for tonight completely slip my mind.  And I'm sure we have all been there, whether away at work all day, busy on a project or just not focused on dinner for the night.  We have all been in that mad dash to the fridge to try and figure out what in the world can be made for dinner.  Well this was one of those nights. 
     I'll be the first to admit that I'm not above just getting take out and hitting up a restaurant when I've forgotten about dinner.  But there was something about spending the whole day in my own kitchen cooking for a different event that made it to where there was no way in the world I was settling for anything but a home cooked meal.  And that is just what I did.
 
Braised Chicken and Brussels Sprouts
4 bone-in chicken thighs, skin on
2 tbsp. extra virgin olive oil
1 pound Brussels sprouts, end cut off and cut in half
4 ounces mushrooms, quartered
1 onion, cut in wedges
2 cups chicken stock
1 tbsp. thyme, dry
Kosher salt
Black pepper
Garlic powder
1.  Preheat oven to 400 degrees F.
2.  Season chicken thighs with salt, pepper, and garlic powder.  In a cast-iron skillet or other oven proof skillet add olive oil and heat over medium heat.  When oil is heated and just beginning to smoke add chicken thighs, skin side down and cook until skin is brown, 5-10 minutes. 
3.  When skin is browned, flip the chicken over.  Add in your Brussels sprouts, mushrooms, onions, and thyme.  Cover with chicken stock.
4.  Place skillet in oven, uncovered for 25-30 minutes or until chicken is done and Brussels sprouts have started to brown and caramelize.


Saturday, January 11, 2014

Parm Meatball


     Still sick.  Sleep is still calling my name...constantly, all the time.  Right now even.  So this is just going to be a recipe share day.  Love making meatballs for people, and not necessarily meatballs just to be smothered in sauce.  I love just having a damn good meatball that can stand up on its own if need be.  This is that kind of meatball for me.

Parm Meatball
1 1/2 pounds ground turkey
1 tablespoon Italian seasonings
2 teaspoons red pepper flakes
2 teaspoons garlic powder
1 large egg
1 cup Parmesan cheese, shredded
1/2 cup Italian breadcrumb
Handful of chopped parsley
Extra virgin olive oil
Kosher salt and black pepper, to taste

1. Preheat oven to 425 F.
2. Place turkey in a bowl and season with Italian seasonings, red pepper flakes, and garlic powder, plus salt and pepper.  Add in egg, shredded cheese, breadcrumbs, parsley and a decent drizzle of olive oil to the bowl.  Mix meat and form into 12 large meatballs or 16 medium sized.
3.  Bake 15 minutes until golden and firm.

Thursday, January 2, 2014

Balsamic Roast Beef


     I have come to realize that checking the Weather Channel at night before going to bed in the months of December through February is probably a very wise idea.  If not, you end up waking up like I did...completely shocked not only by the fact that there is even snow, but the amount of snow that is on the ground and continuing to fall.  Have I mentioned yet that I am not a snow person-at all.  Yes it's pretty the first time it starts falling, but less than 24 hours later it's usually dirty and slushy and at the end of the day it's still cold-very cold.  I see snow and I'm ready to bunk down and not leave my house until it's all melted.  Of course, life and responsibilities usually prevents that from actually happening.  At some point I just have to go outside and struggle through the snow, dig out my car, scrape my windows and get my car to heat up as fast as possible so I can get from point A to point B. (I really really need to get a remote start again-those things are amazing!)  However, on this particular day I don't have to work, I don't have to be anywhere so bunking down is just what I'm going to do, while I silently scorn all those that "love this weather". 
   All this cold weather and hibernating inside did get me thinking about my favorite cold weather foods.  Literally the only good thing about the winter is the fall/winter foods (and Christmas, love Christmas)-slow cooked, warm, hearty meals.  It's when we pull the crock pot out and get to smell the deliciousness cooking all day long.  It's the joy of being able to prep, dump it all in the pot and just let it go and work it's food magic.  And one of my favorite recipes I started making this year is Balsamic Roast Beef.  In general I think I have gone a little balsamic vinegar crazy this year, I keep trying to put it in everything because I think it tastes so good.  From sautéing tomatoes in it to marinating meats, I find myself grabbing and adding a little...or a lot...of it to dishes as I'm making them.  So, when trying to come up with a different beef dish to do in the crock for sandwiches I thought, why not and this is what I came up with.

     I'm going to start out with a little step by step with some picture, and I'll post the full recipe for this here at the bottom.  Hope you all enjoy, and start experimenting with balsamic vinegar more-it doesn't just belong in a salad dressing!

This is just starting out, you need a 3-4 pound chuck roast.  I always go more toward 4 pounds, because the more the better-leftovers freeze.  I didn't trim this roast as much as I normally would, so I would recommend trimming the fat before putting the roast in the crock pot.  Add in your crushed red pepper flakes.
Garlic time!!  I love garlic, when I'm doing a crock pot recipe I don't mess with chopping the garlic.  I pop the individual cloves out of their skin using the knife and gently press the garlic with the side of the knife.  This loosens the skin and makes it so much easier to get the garlic out and keep it intact so you can use a microplane or cheese grater.
Because I use the grater, I usually up the amount of garlic needed by a clove or two just because you don't usually end up using the whole clove (at least I don't, because I would rather not grate my fingers-which I may or may not have done before), so your going to be short unless you add a clove or two to make up for it.
I've added almost everything else at this point, just need the beef stock and then I am ready to start cooking.  Next we just let it do it's thing and then it's time to pull the meat out.
It's already so juicy and tender it was falling apart as I was pulling it out to shred it.  I let it cool for a little bit before I started.  There are a number of ways to do this, you can use two forks and start pulling, you can use your hand and a fork and start pulling apart and if has cooled enough you can just use both hands in general.  They all work, just do what is easiest for you and what you have time for.
After you have shredded your meat, just add it back to the crock pot.
I usually crack the lid at this point and let it cook for at least another 30 minutes.  I want the liquid to reduce a little bit and for the meat to reabsorb some of those flavors.  After that, its ready to go.  It's good on a Hoagie sub, with the extra liquid for dipping, or a regular burger bun and smothering it with juice.  Or you can do what I did and just put it a bowl and eat it that way :) Any way is delish in my mind.

 
Balsamic Roast Beef
1 3-4 pounds boneless roast beef (chuck, trimmed of fat)
1 1/2 cup beef broth
1 cup balsamic vinegar
1 tbsp. Worcestershire sauce
1 tbsp. soy sauce
1 tbsp. honey 
2 tsp. red pepper flakes
5 cloves of garlic, minced
1. Place all of you ingredients in crock pot together.  Cook 6-8 hours on low or 4 hours on high.  Remove chunks of meat from pot and shred with a fork.  Return meat to crock pot and cook on high for another hours.  When finished, can be served on hamburger bun or large hot dog bun, save juices from pot for dipping if you desire.