Pages

Showing posts with label Appetizers. Show all posts

Sunday, June 15, 2014

Marinated Tomatoes

This blog has moved to a different site.  To get more great recipes and see new post, go to cookingwithbrittany.com


One of my favorite things about food is all the food memories that are tied to it.  The way eating your grandmother's pie always reminds you of the holidays or how a picture of smores remind you of your favorite camping trip.  Most people have loads of memories that are evoked from food.  A smell can tell a story and a taste can bring back an old emotion, food and food memories are a powerful thing.

When I was around 17 years old, I went to a family reunion for my mother's side in New York.  One day I came into the kitchen to find my dad, aunts, great aunts and consins all standing around a counter talking in loud excited voices.  Moving closer I heard them exclaiming how great whatever they were eating was.


So, I moved closer still and saw it was some sort of tomato dish.  I wasn't a fan of tomatoes at the time, so I back away.  I listened for a while as my dad went on and on about how tasty something so simple was.  My dad tried pulling me into the conversation and the food.  "Just try it" he said.  "This is what it's all about Brittany, just one bite."

Who was I to say no, I've spoken often on here about how picky I used to be and fruit, pasta and bread were starting to get redundant.  So I gave this tomato dish a whirl.  It just be true that sometimes fathers know best.  This crazy dish I was so afraid of was something as simple as sliced tomatoes, basil leaves and gorgonzola cheese for an appetizer.  Sprinkle that with a little salt and black pepper and you have bite-sized perfection (or two bite perfection for big tomato slices).


That day changed the way I thought about tomatoes though, and most importantly the way that I thought about food.  The ingredients were so simple, but they are pairings that have gone together for years.  It's something I will never forget because it taught me that simplicity must never be over rated.  Sometimes letting a few ingredients stand alone together is the best thing you can do for a dish.

Since then I have grown to use tomatoes a lot more in my cooking.  This recipe came to be because my dad's birthday was coming up and I wanted something to honor the memory that meant so much to me.  It's a mix of that fateful dish in New York, a tomato recipe my mom sent me and my love of balsamic vinegar.

~~~Seems just right to post this recipe on Father's Day given my dad's profound influence.  So to him I say I love you and wish you the happiest of day.  Thanks for always getting me excited about food, even when my food groups consisted of fruit and carbs and your a meat guy.  And happy Father's Day to all the other dad's out there!

Enjoy :)

Marinated Tomatoes
Makes about 2 cups (24 appetizer pieces)
Ingredients:
15-20 basil leaves, chopped
1 bunch parsley, chopped
4 cloves garlic, minced
3 sprigs thyme, leaves removed
3/4 cup extra-virgin olive oil
1/2 cup balsamic vinegar
6 Roma tomatoes, quartered
1/2 tsp. fresh ground black pepper
1 tsp. kosher salt
Blue cheese crumbles or feta cheese *
1 baguette, sliced thinly on a bias, grilled or toasted

Directions:
1.  In a large bowl, mix together all the ingredients except the tomato wedges, cheese and baguette.
2.  Add in the tomatoes wedges and toss to coat.
3.  Marinate at room temperature for 2-4 hours, stirring the mixture every 45 minutes to an hour.  Serve with grilled baguette slices.

*You can use your preference for the cheese, I made this for my dad and his favorite is blue cheese, but I have also used feta as well (which is the cheese that is pictured).

Tuesday, May 13, 2014

Chili Roasted Chickpeas

This blog has moved to a different site.  To get more great recipes and see new post, go to cookingwithbrittany.com


I am a big person for finding inspiration where ever I can, whether it's Pinterest, Facebook, Twitter or right here at Google Plus. 

As it was I found a Roasted Chickpeas recipes on Pinterest that looked great for a healthy little snack or tasty little appetizer to have at a party that I used for inspiration for this recipe.

However, 
                     after deciding to try out this recipe, Joy Stewart from The Joyous Kitchen posted this yummy looking picture of Crunchy Fried Chickpeas with Garlic.

This is Joy's Crunchy Fried Chickpeas with Garlic from her website The Joyous Kitchen
....So I decided to try both recipes out in the same night.  And from that a wondrous thing was born, I mixed the too together.  It sounds so simple, but it truly was just so tasty.  The combination of textures from the two different recipes and the flavors just perfectly complemented one another.  

In closing...this evening of chickpea experiments just reminded me why it is I love find inspiration everywhere, at any time.  Because you just never know what things will call to you and what ideas others are going to give you...so keep on creating!


Below is the Chili Roasted Chickpea recipe I adapted, it's perfect for a snack or little appetizer.  For a side dish, I did the Crunchy Fried Chickpeas with Garlic and tossed it with my Chili Roasted Chickpeas! 

Enjoy :)

Chili Roasted Chickpeas
Makes 1 cup
Ingredients:
15.5 oz. can chickpeas (garbanzo beans), drained
1 tbsp. olive oil
1 tsp. soy sauce
1 tsp. Worcestershire sauce
1/4 tsp. salt
1/4 tsp. black pepper
1 tsp. ancho chili powder
1 tsp. garlic powder

Directions:
1.  Preheat oven to 400 degrees F.
2.  Place chickpeas and all other ingredients in a bowl and combine well, coating the chickpeas completely.
3.  Spread them evenly on a sheet tray and bake for about 40-45 minutes, be sure to check the chickpeas every 15 minutes and give them a toss.

Monday, May 5, 2014

Tomato Salsa

This blog has moved to a different site.  To get more great recipes and see new post, go to cookingwithbrittany.com


We're celebrating Cinco de Mayo today!

Little behind the eight ball, as I am posting this the day of.  But I lost my iPhone to the water on Saturday so I have been out of the digital world since then (STILL NO NEW PHONE...EKK!) and am trying to play catch up on my phone.


This is my tomato salsa recipe, pretty straight forward but full of amazing flavor.  I don't use salsa a lot, but I made this dish for Salsa Burgers I made last August for my Garden Fiesta Mexican inspired cooking class and it has been my go to salsa dish ever since.

Enjoy :)

Tomato Salsa
Ingredients:
6 Roma tomatoes, chopped
4 garlic cloves, minced
2 jalapenos, seeded and minced
2 jalapenos, roasted, skinned and chopped
1 poblano pepper, roasted, skinned and chopped
1 red bell pepper, small dice
1 red onion, small dice
1 tbsp olive oil
1 lime, juiced plus zest
1 tsp. chili powder
1 tsp. kosher salt
1/2 tsp. black pepper
Fresh cilantro, chopped
Fresh parsley, chopped
Scallions, thinly sliced

Directions:
1.  In a bowl, combine all the ingredients except for the cilantro, parsley and scallions.  Toss together and taste, adjusting salt and pepper to taste.
2.  Add in cilantro, parsley and scallions to your preference.  Place in refrigerator up to 12 hours before serving to optimize flavor.

Tuesday, April 29, 2014

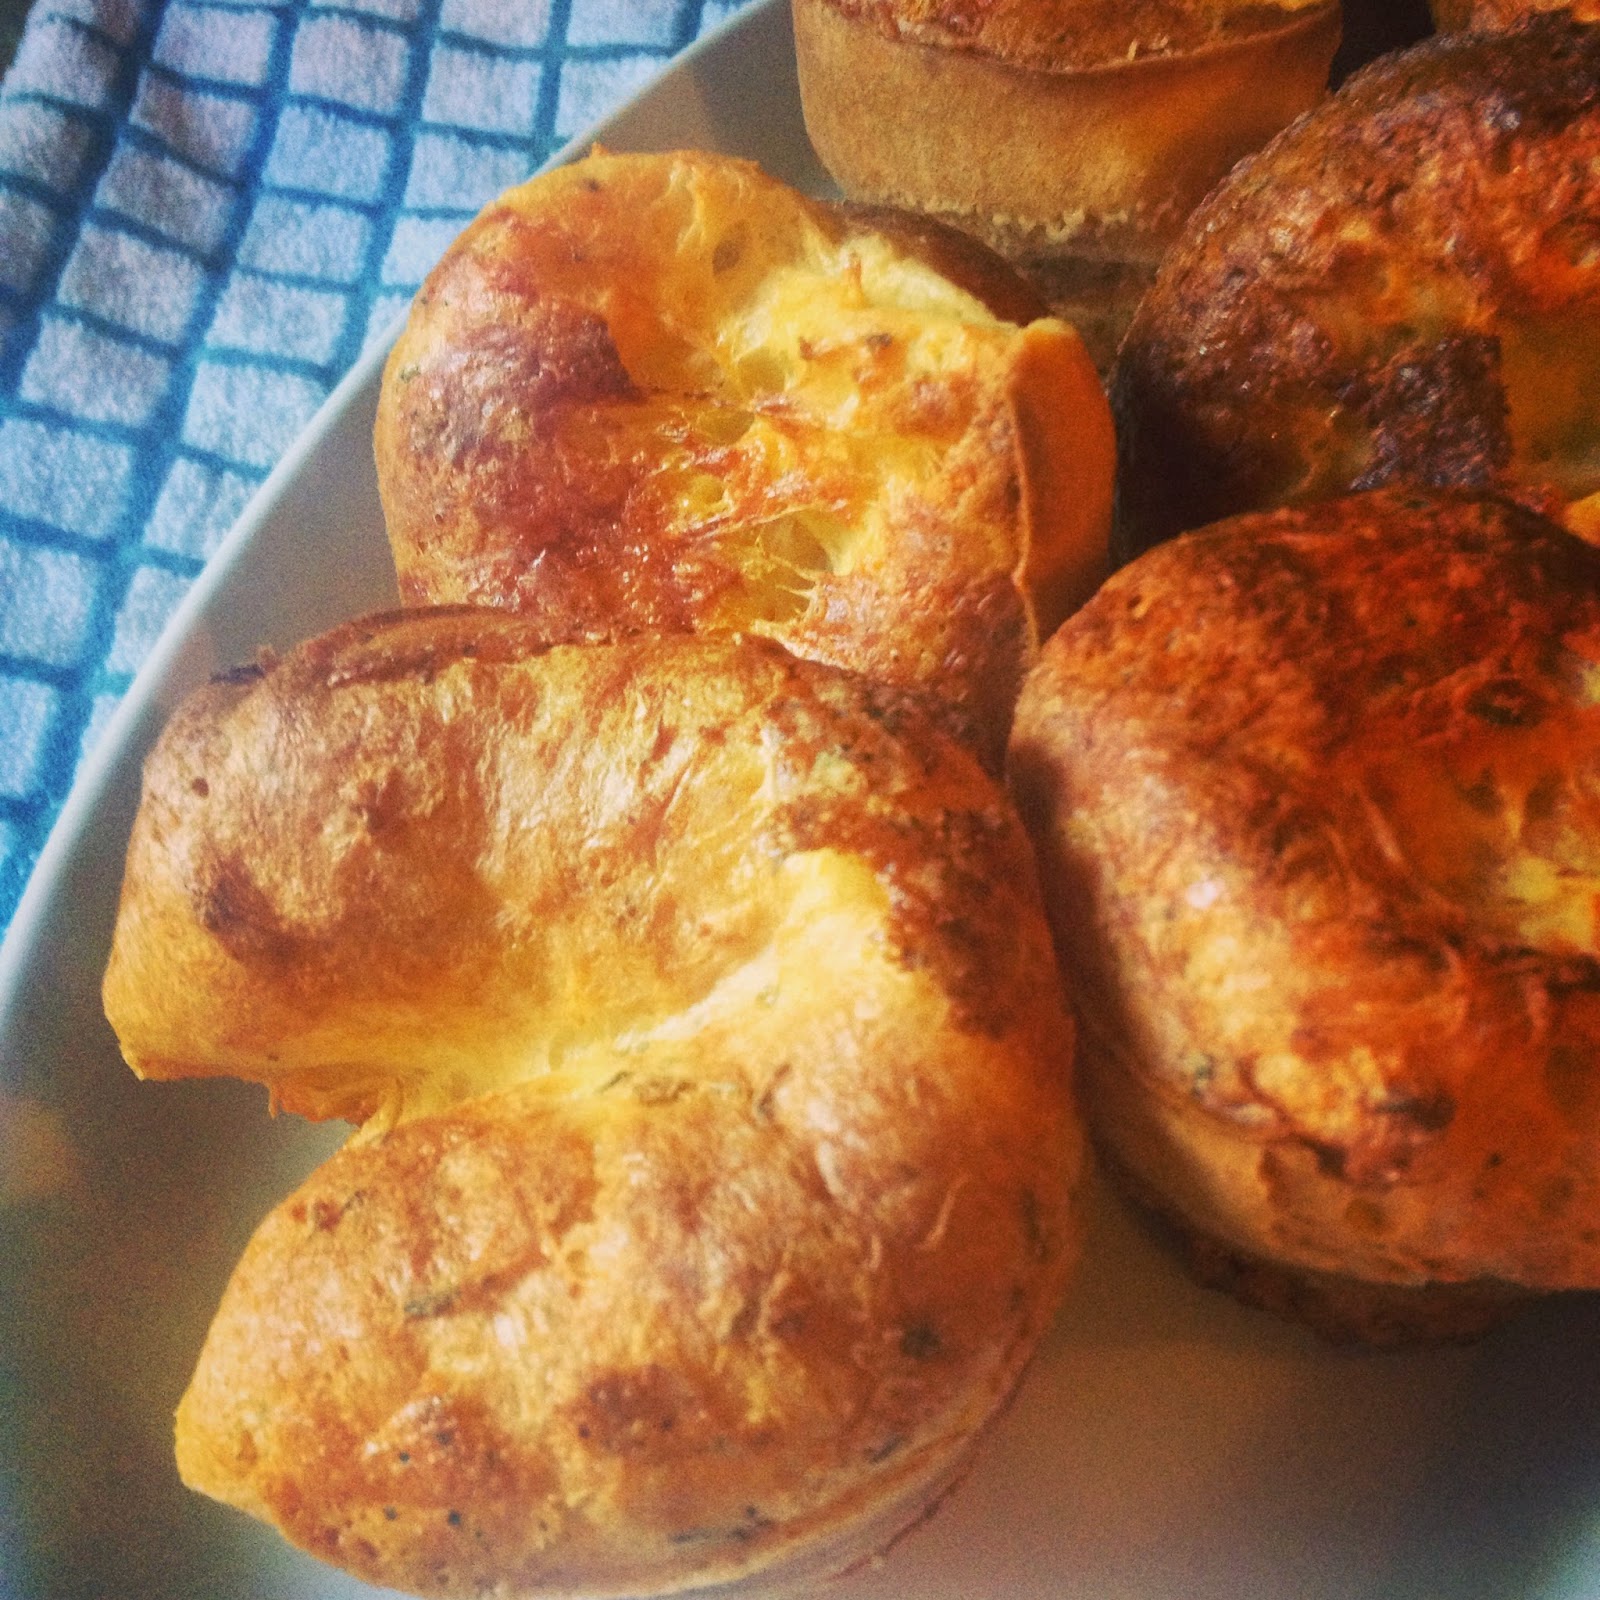
Popovers


This blog has moved to a different site.  To get more great recipes and see new post, go to cookingwithbrittany.com


Popovers...I love them; smothered in gravy, split open and cover in melted butter or simply devouring them warm and just out of the oven all on their own.

HOWEVER....
    I can't make them.  I have tried many times to make popovers, but mine just don't pop.  Sure they are tasty, yes they still have lovely flavor.  But when it comes right down to it, my popovers just don't pop.
The last time I tried making them with no success, I put the failure behind me, I vowed never again.

That was six months ago...
     And oh how those popovers haunted me over that time frame.  In my head, on the internet, and even making numerous appearance on the various food shows I watch.  One particular episode of Triple D (Diners, Drive-in & Dives) almost caused me to weep looking at the most amazing and mouth watering popovers I had even seen, that were made at a restaurant in Austin, TX called Foreign & Domestic.   They looked so good, as did everything else that they showed on the episode that I am still trying to figure out when I can get to Denver just so I can go to this place.

But still I resisted the urge to try and make them again, afraid that they would get the better of me one more.  Until the day I brought a bottle of wine over to my parents house, and shared a few glasses of red with my mom and grandma as we sat around the island in her kitchen preparing the menu for our Easter dinner that weekend and my grandmother got the bright idea to suggest we make popovers.
NOOOOOOOOOO!!

     I wanted to scream it, I wanted to shout it, but I just tried suggested other things that we could make.  Not only was I outvoted 2 to 1, it's my grandma and my mom...who was I to argue that.
Because of my on going war with popovers though, we did all decide to meet that Good Friday and attempt making popovers before the big day to see if it could in fact be done.
We didn't use a fancy popover pan, or go too crazy the first go around but we did it.  Did you get that part....WE DID IT!

Those popovers popped and they popped beautifully.  I don't know if all my failed attempts in the past were the fault of my oven, my crumby muffin tins, my equally crummy attitude as my number of failed attempts grew or if by some design the popover goddesses just knew they needed to wait for this day.
A day where it was just me and my mom, my grandma and my little sister laughing and having a good time in the kitchen together, and then the popovers popped.
Enjoy.
Popovers
Makes: 20 (in a muffin tin)
Ingredients:
4 ounces butter, melted
6 eggs
2 cups all-purpose flour
2 cup milk
1 cup shredded mozzarella cheese, plus more for sprinkling
1 tsp. salt
1 tbsp garlic powder
1 tbsp ground thyme
1 tbsp. ground oregano
Black pepper
Butter or cooking spray
Flour, for dusting in muffin tins.
Directions:
1.  Preheat oven to 450 degrees F.
2.  Take your muffin tin and using the butter or cooking spray light coat the inside of your muffin tins.  Sprinkle with flour and move tray around to coat the butter/cooking spray with flour (like you would butter and flour a cake pan).  Dump out any excess flour and set aside.
3.  In a large mixing bowl add in your eggs, and beat 1 minutes.  Add in the milk, flour, garlic powder, thyme, oregano, salt and melted butter and combine. Stir in the cheese.
4.  Using a ladle, fill muffin tins 3/4 of the way full with batter.  We filled about 18-20.  Sprinkle each with black pepper and shredded cheese to taste.  Place in the oven and cook for 20 minutes.  Reduce heat to 350 degrees F and continue cooking for another 15 minutes or until the tops are nice and browned.

Monday, March 17, 2014

Sriracha Broccoli Bites


I love finding fun and new ways to put a spin on some of my side dishes.  And when cruising Pinterest I found these fun little Broccoli Bites that look simple and tasty that I new I just had to try soon.  Finally got around to trying them, I adjust the recipe to spice it up a bit-but I thought the end result was a yummy little way to change up your standard steamed broccoli.

Enjoy!


Sriracha Broccoli Bites
(Adapted from Stacey Snacks: Broccoli Bites for Kids )
Ingredients:
16 oz. fresh steamed broccoli, roughly chopped
1 1/2 cups grated parmesan cheese
3 eggs
1 cup seasoned Italian breadcrumbs
1 tsp. cayenne pepper
2 tbsp. Sriracha sauce
1 tsp. crushed red pepper flakes
1 tsp. garlic powder
Kosher salt and freshly ground black pepper

Directions:
1. Preheat oven to 400 degrees F.
2. Mix all the ingredients together in a large bowl.
3. Using your hands, form a small patty and line up on your parchment paper lined sheet tray.
4. Bake for 10-15 minutes and flip if tops are golden.  Bake for an additions 5-10 minutes.

 Want more recipes, food info and picture more often, follow me on Facebook.  Check it out at the link below!
Brittany M on Facebook at: Cooking with Brittany

Wednesday, March 12, 2014

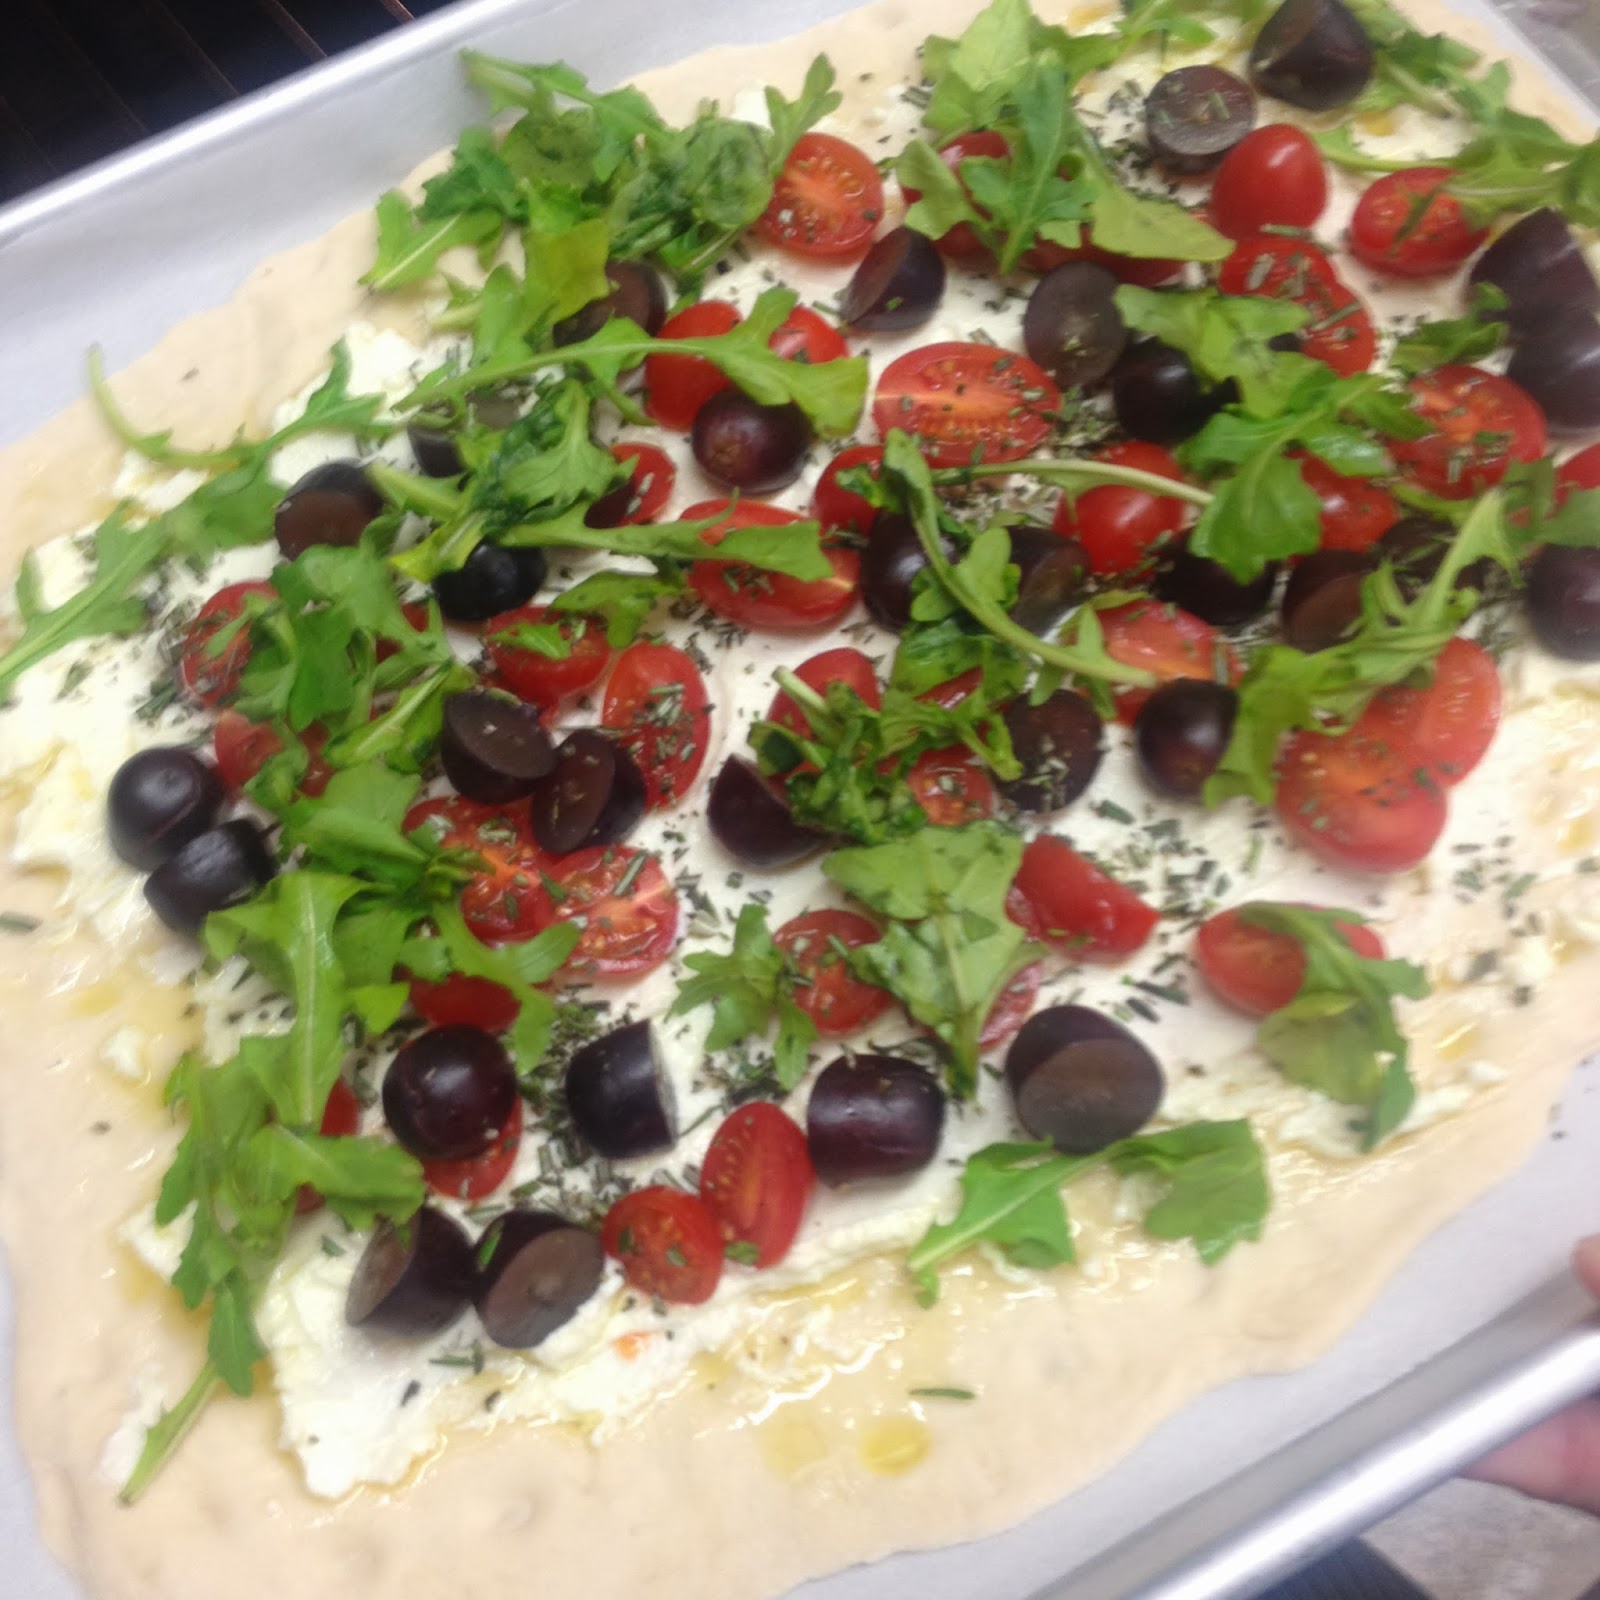
Cherry Tomato and Grape Flatbread


Recently I decided to try and find some fun and different ways to make flatbreads or pizza besides your traditional pizza sauce and meat and/or veggie toppings.  Not that a don't love a good homemade slice of pepperoni pizza, I do.  But I love exploring with different sauces and toppings and combinations.  After searching a little I found a lot of different roasted tomato flatbreads recipes, so I decided to take that idea and adapt it slightly with different herbs and by adding some other ingredients...like grapes.

GRAPES?? I know, I know, it sounds a little strange.  But growing up I remember my dad letting me make grape kebobs and cooking them on the grill like any other kebob and I just remember being so surprised by how yummy it was.  It was just this really warm pleasant flavor that I have always enjoyed and wanted to incorporate into a dish.

So give it a try...if you really don't want to add the grapes you don't have too (I'm all about making recipes your own) but I urge you to give this little surprise a try!
Enjoy.

Cherry Tomato and Grape Flatbread
Serves:3-4 (1 flatbread)
Ingredients:
Flatbread dough (homemade or store bought)
Extra virgin olive oil
4 oz. ricotta cheese
1 cup cherry tomatoes, halved
1 cup wine grapes, rinsed and halved
3 sprigs rosemary, minced
2 sprigs oregano, minced
1 sprig thyme, minced
Kosher salt
1 cup arugula
Directions:
1.  Preheat the oven to 400 degrees F.  Line baking sheets with parchment and sprinkle with flour.
2.  Roll out the dough into a loose rectangle, about 1/4 inch thick.  Transfer this to the prepared baking sheet.
3.  Dot the dough using your finger, making small indents in it.  Brush with extra virgin olive oil.  Spread the ricotta on the surface and then scatter the tomatoes and grapes over the top of that.  Sprinkle with the rosemary, thyme, oregano and salt to taste.
5.  Bake until the crust is golden and the topping nicely charred, about 25-30 minutes.  Top with fresh arugula.


**This picture is from the class I taught, which is why the arugula looks cooked they placed in on the flatbread before baking.  As soon as I get a chance I will be adding new updated pictures, just wanted to share as soon as I could!

Want more recipes, food info, and pictures more often?  Then follow me on Facebook!  Click then link below to check out my Facebook page.
Brittany M on Facebook at: Cooking with Brittany

Tuesday, March 4, 2014

Bacon Jam


Everything is better with BACON!!  It's has to be, I think at this point it's probably a proven fact (if you can dip bacon in chocolate and it tastes good, its a fact).  Recently I had my Bacon class and my list of things I wanted to make with the participants was endless! 
 
Sautéed bacon, onions, and garlic.
 

There are just so many different things that one could and does do with bacon.  Unfortunately due to time, bacon jam just didn't make the list of things we could do in the two hour time frame.  But don't you worry, I just couldn't resist making this at home and trying it out. 
 

After transferring onion, garlic, and bacon to Dutch Oven and adding in the liquid ingredients.
 
First of all though what is Bacon Jam exactly.  I wouldn't say its a jam per say, but more so a "jam" in the sense that it has that consistency.  The best description I can give is that it's more like a reduction of sautéed bacon, onions and garlic and a few other liquid ingredients that are slowly cooked down.  The cooking concept is similar to how you might make an apple butter or pumpkin butter but because of the bacon in it, it will have a thicker, chunkier consistency like a jam.
 
After reducing for an 1 1/2 hours, the color has really deepened
 
After trying this when it was finished, it was just a tad on the sweet side for me, so I added in some cayenne pepper and next time with add in crushed red pepper flakes in the beginning with cooking the onions and garlic.
 

Bacon Jam
Ingredients:
1 pound bacon, cook and crumble into small pieces
6 cloves garlic, minced
1 tbsp. crushed red pepper flakes (optional)
1 onion, small dice
3 tbsp. brown sugar
1 tbsp. hot sauce (optional)
1 tsp. cayenne pepper
1 cup brewed coffee
1/4 cup apple  cider vinegar
1/4 cup maple syrup
Black pepper, to taste
Extra water

Directions:
1.  In a non stick pan, using the render fat from your cooked bacon sauté the onion, garlic and crushed red pepper flakes until the onions are translucent and the garlic is aromatic.
2.  Transfer the bacon, onion and garlic mixture into a Dutch Oven (or any other heavy based cast iron pot) and add the rest of the ingredients except for the water.
3.  Simmer for around two hours, adding 1/4 cup of water every 20 minutes or so (when your mixture has reduced down you are ready to add more water, the timing various) and stir.
4.  When the mixture is ready, let cool and then place in a food processor.  Pulse a few times, being sure to leave a little chunky so you still have some texture.  (Or keeping blending to the desired texture you would like.

Want more recipes, food info, and pictures more often?  Then follow me on Facebook!  Click then link below to check out my Facebook page.
Brittany M on Facebook at: Cooking with Brittany


Monday, January 27, 2014

Citrus Marinated Olives


   Delicious orange juice, spicy jalapenos, herbaceous cilantro and parsley- these are some of the things that I really like about this citrus marinated olive dish.  It gives a nice little spin on your cocktail olives.  And enables you to make something a little bit special and a little different in advance and be able to wow your guess with the flavor. 

     I originally made this recipe when I had to come up with a special to put on the menu in my Specialized Cuisine class.  I had been assigned Spain as my region to do my report and presentation on as well as develop one appetizer and one main dish based on the cuisine.  I decided to do a tapas style dish with different items that were based on five main areas in Spain.  So this citrus marinated olive dish came about.  It's one of my favorites because you can control the amount of heat if need be.  When I did this for a special I usually topped with thinly sliced jalapenos and lemon zest but when making it at home I mix it right in and then add more on top if I don't think it's spicy enough.  Whichever you prefer is fine.
Citrus Marinated Olives
Makes 3 cups
 
1 1/2 cups Kalamata olives
1 1/2 cups green olives
1 cup olive oil
1/2 cup fresh cilantro, minced
1/4 cup fresh parsley, minced
1/4 cup lemon juice
1/4 cup orange juice
8 garlic cloves, thinly sliced
2-3 jalapenos, thinly sliced
zest from 1 large lemon
zest from 1 orange
1 teaspoon dried crushed red pepper flakes
1 teaspoon Kosher salt
 
1.  Combine all of the ingredients in a large Ziploc bag or large bowl.  Shake bag to blend ingredients or if in bowl stir to combine.  Refrigerate at least 1 day and up to 3 days, tossing ingredients occasionally. 
2.  When ready to serve, transfer to a serving bowl.  Let stand 1 hour at room temperature before serving and top with additional thinly sliced jalapeno and lemon zest if desired.
 

Thursday, January 23, 2014

Bacon Wrapped Stuffed Mushrooms


     This weekend was a crazy busy time.  With graduation happening this past December, we pushed back a party until January so we weren't interfering with any holiday plans people might have.  Single best idea, I had one aunt and cousin make a surprise trip up from Florida and that completely made the weekend!  Don't get me wrong, I spent all of last week preparing and prepping for Saturday and then spent all of Saturday freaking out that I wasn't going to have everything done in time.  (Did I mention I am a slight control freak, so when my parents decided to throw the party I took over all of the food planning and prep and wanted to do it all on my own-talk about giving yourself a mini heart attack!)  But all of that was well worth it just to get to spend a great time with family and friends and see them enjoying the food that I made. 

     These little crazy delectables might not look like much but their filling packs a delicious punch with all the green onions and garlic mixed into the cream cheese mixture.  And what item isn't better with BACON??  Not to mention wrapped in bacon, that just takes me to a happy little place.  For now I'll just post the one picture I have from the party.  But I'll be making these little babies again soon at home and I'll have my camera a little more handy so I can take better pictures and I'll update the post then.  Just knew that it's almost been TEN days since I last posted.  Goodness I didn't even realize that it had been that long.  My new mission now is to try and actually make a post every day if I can (this is the only reason I didn't post all of the picture and recipes from this past weekend).


Bacon Wrapped Stuffed Mushrooms
20 baby bella mushrooms, stems removed
4 oz. cream cheese
5 green onions, thinly sliced
1 bulb roasted garlic
Kosher salt
Ground black pepper
10 slices thick cut bacon

1.  In a small bowl or mixer, combine cream cheese, green onions, roasted garlic and salt and black pepper.  Mix to completely combine.
2.  After stems have been removed from mushrooms, and cleaned stuff each mushroom with cream cheese mixture.
3.  Cut each slice bacon in half.  Wrap each half slice of bacon around a stuffed mushroom.  Use a toothpick to secure if needed (optional).
4.  Place wrapped mushrooms on a cookie sheet.  Place cookie sheet in a oven that has been preheated to 425 degrees F.  Cook until bacon is crisp and mushrooms are soft, around 30 minutes.

Friday, January 10, 2014

Roasted Butternut Squash and Arugula Salad

 
     So obviously it's the get sick season.  And that season has officially hit my household, ok-it's officially hit me, no one else.  And I'm glad, really I am that I am the only one that is sick.  But in the tiniest darkest part of my brain, I think "why did it have to be me??"  But it is me, so might as well make the most of it while I can.  And trust me there's not a lot to make of it, I spent all of yesterday laying/sleeping on my couch off and on all day until I finally made my way back upstairs to go to bed.   Not a pleasant day and I vowed that today I would be better. 
     Ha!  I don't know if your bodies have ever listened when you said you didn't want to be sick.  But mine does not, it never has, so if you have a secret answer to this-SHARE!  And though I don't feel as tired, I feel like I am 100% out of it and slightly in a daze, so if none of this blog makes sense today it's not my fault!!  Hell, I'm not sure that I'll even end up posting this one just because I'm afraid it's going to be a mixture of self medicated sick person rambling.  Tell me that we have all been there and it's not just me??......................Anyone?
     I'm bummed to say that at least for today I probably am not going to be cooking anything special.  And most likely won't be cooking at all, we'll see though.  I'm starting to go through kitchen withdraw and I think you take cabin fever to a whole new level when your sick on top of it all. 
     So until I am feeling a little bit better, which is hopefully soon, there will be no leek frittata or butternut squash soup.  Or no spice crusted venison.  GRRRR!  I am determined tomorrow that I will be well enough to make these things.  Or to at least make something-I'd settle for just a simple scrambled egg in the morning.  But since it is a non-cooking day, and in ode to the Butternut Squash Soup dish I should be making tonight I'll share with you my Butternut Squash and Arugula Salad.  

     Butternut squash is a winter squash, which has a sweet nutty flavor that is similar to pumpkin.  You can roast it-which is probably the most common way that I have seen it prepared or served, and how we prepared it in the salad.  You can use it in purees and I'm thinking it might be an interesting substitute to pumpkin in some sort of muffin preparation.  And like I said before, I'd really like to try out a spicy butternut squash soup of some sort.  However, until I am feeling a little bit better (or can stand up straight for longer than 5 minutes without wanting to pass out) I'll just have to make due with sharing a recent recipe I made with one of my classes and made again at home so I could take pictures and give you guys a little bit more visuals.  Hope you guys enjoy it like I did, and I am JEALOUS of any and all of you that are not sick right now!


Roasted Butternut Squash and Arugula Salad
Serves: 4
1/2 pomegranate
1 butternut squash; roasted
6 slices bacon; cooked and crumbled
1 package arugula
8 oz. goat cheese
Olive Oil
Kosher salt
Black pepper

1.  Roast the butternut squash at 400 F for 25-30 minutes or until nice and soft.  Cube when cool enough to handle.
2.  Deseed the pomegranate, rinse well and set aside.
3.  Cook the bacon, and drain it on paper towels.
4.  Mix everything together in a large bowl with a few tablespoons of olive oil.  Taste for seasoning and add salt and pepper as needed.


Wednesday, January 8, 2014

Homemade Farmers Cheese


     Well the snow arrived, as did the freezing cold weather.  I mean, FREEZING.  Record low temperatures hit our town and the city was placed under a travel warning-(even though there were still plenty of idiots out there trying to drive).  We are currently on day 3 of schools being closed and even though the driving ban was finally lifted yesterday morning, a lot of people still have cars that are completely stuck or snowed in (like me) and we're all starting to experience a little bit of cabin fever.

First tree casualty
     Okay, maybe not a little bit.  People are bored out of their minds and getting a little stir crazy.  And I don't blame them one bit, I have been in the same boat myself.  Who know if I was actually planning on going any place or do anything special, it's just the fact that the weather has taken the choice out of my hands that has me going a little nuts. So what doesn't any food loving person do when their stuck inside, they cook!  At least I do.  It was a great way to get to do some recipe testing for upcoming classes and just having fun in general in the kitchen.
Second Tree Casualty
        One thing that I did decide to do was make cheese!  It's something I've always wanted to try making, and we had attempted it in one of my classes in culinary school, but literally not one single groups cheese turned out.  Something with the rennet, anyway ever since I've been waiting to try and make it again-and successfully. Finally gave it a go with this snowed in weather.   I didn't go all crazy in the cheese making since I am still a beginner, I just wanted a simple farmers cheese.  It was very easy to make and I'm really excited to play around with different flavors of cheese to make later! 


You will need: 1 gallon whole milk, 1 cup white vinegar, 4 tsp salt
Add milk and salt to stainless steel pot and heat to 190 degrees F.

When you've reached temp, immediately add in vinegar and stir in completely. 
Let set for 20-30 minutes, so milk can completely curd.
Drain in cheesecloth lined colander or strainer.
I pressed as much of the whey out as I could but I also let it hang for about 20-30 minutes off the side of the pot so that I could get as much of the moisture.
Which is why the cheese has all the funky lines on it from the cheesecloth.  This cheese would be good to crumble over a salad, like you might with feta.  Or as a spread on baguette slices.


     So, this is just the beginning.  Looking forward to flavoring the cheese up a bit and making a herb cheese, or jalapeno cheese-add chopped nuts.  The possibilities are endless and I'm getting excited just thinking about it.  Next after that is making ricotta cheese.  Then....who knows, mozzarella looks fun to make!  I think with all this cheese though, we're definitely going to need some wine!  What about wine stumping, I love Lucy style.  At the Blizzard party last night I had a friend say we needed to do this, and I must say the idea is pretty tempting......