Pages

Friday, March 28, 2014

French Onion Soup


This past Thursday I had my French class that I taught, and we made a few French dishes that I love to eat.  Among them we made, Steak au Poivre (Pepper Crusted Steak) with a Cognac Sauce, Ratatouille, Crepes with an Apple Caramel Sauce and French Onion Soup. 

Now after going to Culinary School, and taking my Classical Cuisine class (which was a restaurant run class serving "classical French foods") I have ingrained in my head where I can no longer call it French Onion Soup.  Because in that class, it was a French menu, therefore according to one of my instructors it should simply be called Onion Soup because the French should have been a given.


But for the purposes of this blog that is neither here nor there, just a little insight on how my brain functions.  Anyway.....French Onion Soup, something that my mother has been asking me for years to make her.  Not sure why, but when I started my culinary venture, she just said she would really like me to make it for her at some point.

And I am sorry to say for years up until this point I have played the bad daughter roll because I haven't made it for her.  It was one of those things that I was always so-so on because the recipe always seemed so simple.  What could be so special about onions in a beef broth with bread and some gruyere cheese?  But it's those very things that make this a delicious dish for all to indulge in, and of course I made my momma happy when I presented her with a bowl of this.
Enjoy

French Onion Soup
Serves: 4-6
Ingredients:
1/2 cup unsalted butter
4 onions, sliced thinly
4 garlic cloves, minced
2 bay leaves
3 fresh thyme sprigs
Kosher salt and freshly ground black pepper
1 cup red wine
3 tbsp. all-purpose flour
2 quarts  beef broth
1 baguette, sliced
1/2 pound Gruyere, grated

Directions:
1.  Melt the butter in a large pot over medium heat.  Add the onions, garlic, bay leaves, thyme, and salt and pepper and cook until the onions are very soft and caramelized, about 25 minutes. 
2.  Add the wine and bring to a boil, reduce the heat and simmer until the wine has evaporated and the onions are dry, about 5 minutes.  Discard bay leaves and thyme sprigs.
3.  Add the flour in with the onions and stir.  Turn the heat down to medium low, and cool out the raw flour taste, about 5 minutes.  Pour in beef broth and bring the soup back to a simmer, and cook for 10 minutes.  Season to taste, with salt and pepper.
4.  Preheat your broiler when your close to serving the soup.  Arrange the baguette slices on a baking sheet in a single layer.  Load the slices with Gruyere cheese and sprinkle with salt and black pepper.  Broil until bubbly and golden brown, 3 to 5 minutes.
5.  Ladle the soup in bowls and float several of the Gruyere croutons on top.


Want more recipes, food info and picture more often, follow me on Facebook.  Check it out at the link below!
Brittany M on Facebook at Cooking with Brittany

Saturday, March 22, 2014

Sweet Potato Fries with Sriracha Thyme Mayo


Growing up the only way that I ever thought of sweet potatoes was mashed up with marshmallows on top, and that was only one day a year.  Our Thanksgiving tradition, thanks to the fact that my mother loves sweet potatoes (us on the other hand, we weren't fans), was to make sure that next to the dish of mashed potatoes was a bowl of orangey stuff with marshmallows browned on the top. 
It was the one time as a child that marshmallows just never looked good.  Until of course I grew up and decided that I was no longer going to be a picky eater and was going to start giving food a chance.  Well, maybe food......some dishes from the past just never recovered for me.


Unfortunately, that never changed for sweet potatoes.  At least in the way I had always had them.  Mashed with marshmallows just still isn't my thing, but a few years ago I found a recipe for sweet potato fries and had decided to give it a try when I was trying to find healthy alternatives for chips and fries. 
And WOW! I loved them, ever since then it's one of my go to recipes when we are grilling burgers or brats.  I usually go with my spicy sweet potato fries as I am not a fan of the sweet version (i.e. let's dump a whole bunch of cinnamon sugar on them) because it reminds me of the Thanksgiving dish I see every year. 

However, when I know I am going to have kids eating or non-spicy food eaters, I go with my herb and garlic version with a sriracha-thyme mayonnaise as a dipping sauce option for those that want the spice and heat.
Enjoy.


Sweet Potato Fries with Sriracha Thyme Mayonnaise
Serves: 4
 
Ingredients:
4 medium sweet potatoes, scrubbed and peeled
2-3 tbsp. extra virgin olive oil
1 tbsp. onion powder
1 1/2 tbsp. garlic powder
1 tbsp. thyme leaves, minced
1 tbsp. oregano leaves, minced
1 tbsp.  rosemary, minced
1 tsp. freshly ground black pepper
1/2 tbsp. crushed red pepper flakes
1 cup mayonnaise
2 tbsp. Sriracha sauce
1 tbsp. thyme leaves, minced
Kosher salt

Directions:
1.  Preheat your oven to 425 degrees F.
2.  Cut the sweet potatoes into 1/4 inch thick fries.
3.  In a large bowl, combine the onion powder and garlic powder, thyme, oregano, rosemary and black pepper.  Season with kosher salt.
4.  Add potatoes into the bowl of spices and drizzle with olive oil and toss to combine.
5.  Place you sweet potato fries on a baking sheet and bake for 15 minutes.  Flip fries and continue baking for 5-10 minutes or until done.


 Want more recipes, food info and picture more often, follow me on Facebook.  Check it out at the link below!
Brittany M on Facebook at: Cooking with Brittany


Tuesday, March 18, 2014

Frozen Birthday Cake


So recently, I shared my first cake attempt when I made the Spider-Man Batman Cake.  With my little sisters birthday fast approaching after that, I had to get out of the mind set of action figures and superheroes and start thinking about princesses and Disney.  With the recent movie hit FROZEN, I pretty much knew my theme.  She loved the movie, went to the theater multiple times, got the sound track and is pretty much in love with the movie.  (And I have to admit I'm a fan of the movie as well.)  So Frozen themed it was, and then she decided she wanted a castle cake.  And then she wanted snowflakes.  And strawberries.  And just vanilla cake.  And her characters on the cake, had to be her characters.  And snow all over.  And could I make a staircase just like the one in the movie (that was a definite no, I knew better to even attempt that).  And....
Did I mention she was turning 7?  And that this particular little soon to be 7 year old is extremely hard to say no too, especially when she tells me that she just knows however I make it,  "that it's going to be beautiful".  How do you say no to that??? Huh?  You don't, you just figure it out, cross your figures and hope that your second cake attempt isn't a complete disaster and make said birthday girl happy.
So here it is. Enjoy :)


I bought this Castle Cake Set at Hobby Lobby, I know I have seen all over the internet where you can make your own towers.  But when I saw this, and then armed with my 40% off coupon I just couldn't past it up.  I did a rough set up here just so I could get a little bit of an idea how I wanted to the whole thing up.
The very first thing I did for the cake was start making "shingles" for my tower roofs using this circle cutter.

Three of the tower tops after I had covered them in the fondant shingles I made so it gave the roofs a little bit more of a realistic look.

End result after covering in fondant shingles.

New "buttercream" recipe I tried out for this cake, there's no butter in this one, so I used shortening and butter flavorings so that I could be sure my icing would be white instead of the yellowish tint typical buttercream can be. 

I filled the middle of the cakes with an outer border of the buttercream and filled with strawberry preserves before I topped it and then iced the whole layer (2 cakes per layer or tier).


I refused to buy another packet of dye just so I could have the premade teal color from Wilton, so since I already had royal blue and green I added a little of both of those to my white fondant to get the color I was looking for.


Finally got the fondant to the teal color I was looking for.

Door and windows (four windows missing from picture) once fondant trim had been added.

Top cake, after being iced and having the fondant snowflakes added (medium and small).  I got the snowflake cut outs from a Winter and Holiday Cake Kit made by Buddy Valastro (CAKE BOSS) that I found on clearance a couple months ago.

Bottom cake after it had been iced and the fondant snowflakes (large and medium) had been added on.


The finished cake, didn't get a chance to get a picture without anything behind it.  But you pretty much get the idea of what the cake looks like.  I put icing on my shingled roofs and then sprinkled them with clear sprinkles and this glittery stuff I found.  Truth be told there is a lot more that I would have added to the cake if I had had more time, but I think the best part was that the birthday girl loved it!


Monday, March 17, 2014

Sriracha Broccoli Bites


I love finding fun and new ways to put a spin on some of my side dishes.  And when cruising Pinterest I found these fun little Broccoli Bites that look simple and tasty that I new I just had to try soon.  Finally got around to trying them, I adjust the recipe to spice it up a bit-but I thought the end result was a yummy little way to change up your standard steamed broccoli.

Enjoy!


Sriracha Broccoli Bites
(Adapted from Stacey Snacks: Broccoli Bites for Kids )
Ingredients:
16 oz. fresh steamed broccoli, roughly chopped
1 1/2 cups grated parmesan cheese
3 eggs
1 cup seasoned Italian breadcrumbs
1 tsp. cayenne pepper
2 tbsp. Sriracha sauce
1 tsp. crushed red pepper flakes
1 tsp. garlic powder
Kosher salt and freshly ground black pepper

Directions:
1. Preheat oven to 400 degrees F.
2. Mix all the ingredients together in a large bowl.
3. Using your hands, form a small patty and line up on your parchment paper lined sheet tray.
4. Bake for 10-15 minutes and flip if tops are golden.  Bake for an additions 5-10 minutes.

 Want more recipes, food info and picture more often, follow me on Facebook.  Check it out at the link below!
Brittany M on Facebook at: Cooking with Brittany

Wednesday, March 12, 2014

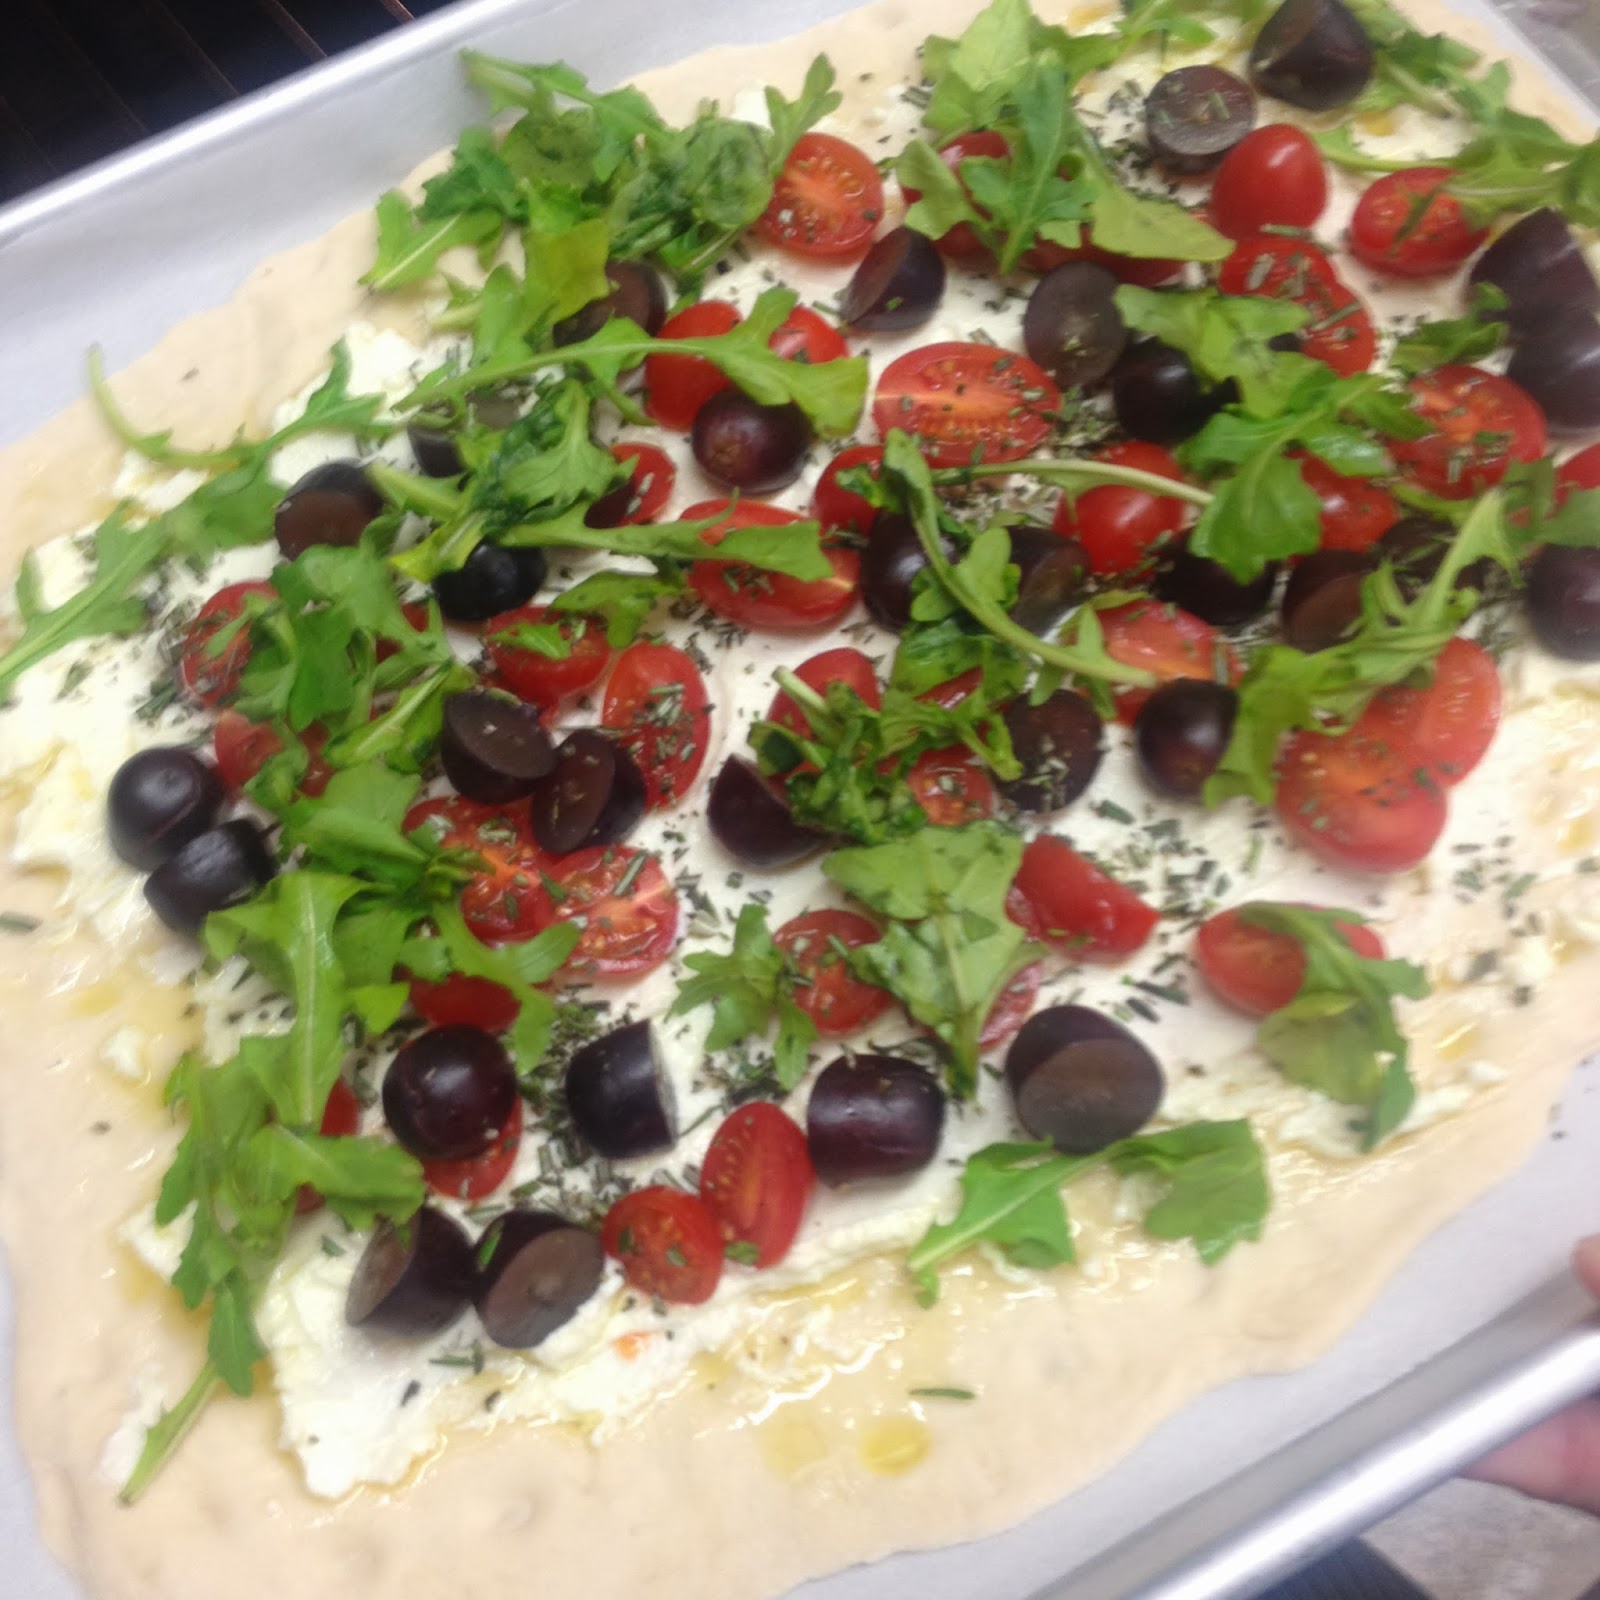
Cherry Tomato and Grape Flatbread


Recently I decided to try and find some fun and different ways to make flatbreads or pizza besides your traditional pizza sauce and meat and/or veggie toppings.  Not that a don't love a good homemade slice of pepperoni pizza, I do.  But I love exploring with different sauces and toppings and combinations.  After searching a little I found a lot of different roasted tomato flatbreads recipes, so I decided to take that idea and adapt it slightly with different herbs and by adding some other ingredients...like grapes.

GRAPES?? I know, I know, it sounds a little strange.  But growing up I remember my dad letting me make grape kebobs and cooking them on the grill like any other kebob and I just remember being so surprised by how yummy it was.  It was just this really warm pleasant flavor that I have always enjoyed and wanted to incorporate into a dish.

So give it a try...if you really don't want to add the grapes you don't have too (I'm all about making recipes your own) but I urge you to give this little surprise a try!
Enjoy.

Cherry Tomato and Grape Flatbread
Serves:3-4 (1 flatbread)
Ingredients:
Flatbread dough (homemade or store bought)
Extra virgin olive oil
4 oz. ricotta cheese
1 cup cherry tomatoes, halved
1 cup wine grapes, rinsed and halved
3 sprigs rosemary, minced
2 sprigs oregano, minced
1 sprig thyme, minced
Kosher salt
1 cup arugula
Directions:
1.  Preheat the oven to 400 degrees F.  Line baking sheets with parchment and sprinkle with flour.
2.  Roll out the dough into a loose rectangle, about 1/4 inch thick.  Transfer this to the prepared baking sheet.
3.  Dot the dough using your finger, making small indents in it.  Brush with extra virgin olive oil.  Spread the ricotta on the surface and then scatter the tomatoes and grapes over the top of that.  Sprinkle with the rosemary, thyme, oregano and salt to taste.
5.  Bake until the crust is golden and the topping nicely charred, about 25-30 minutes.  Top with fresh arugula.


**This picture is from the class I taught, which is why the arugula looks cooked they placed in on the flatbread before baking.  As soon as I get a chance I will be adding new updated pictures, just wanted to share as soon as I could!

Want more recipes, food info, and pictures more often?  Then follow me on Facebook!  Click then link below to check out my Facebook page.
Brittany M on Facebook at: Cooking with Brittany

Wednesday, March 5, 2014

Balsamic Tomato and Asparagus Salad


I love asparagus, and I have found that after grilling it all last summer when fall and winter rolled around I kissed asparagus goodbye and quit making it.  Why why why?  Simply silly on my part because there are plenty of other ways to cook asparagus inside.  So I started roasted them.
 

This has been my go to way of cooking them when it's too cold for me to go outside.  I'm not much of a fan of blanching vegetables unless absolutely necessary so I usually avoid that method and try and find a different way to cook them that will add and enhance the flavor of the dish.  Paired with balsamic tomatoes, this is a perfect colorful dish that looks impressive but doesn't take a whole lot of work.

Balsamic Tomato and Asparagus Salad
Serves: 4
Ingredients:
1 bunch asparagus, ends trimmed
1 cup cherry tomatoes, cut in half
4 cloves garlic, minced
2-3 tbsp. balsamic vinegar
 
Extra virgin olive oil
1 1/2 tsp. crushed red pepper flakes
1 tsp. garlic powder
Kosher salt
Freshly ground black pepper
Feta cheese

Directions:
1.  Preheat oven to 400 degrees F.
2.  On a sheet tray, line out your asparagus and drizzle with olive oil and crushed red pepper flakes, garlic powder, salt and black pepper.  Toss to coat.
3.  Bake until tender, 15-20 minutes.  When done cut in half on a bias.
4.  While your asparagus is cooking, sauté your garlic and cherry tomatoes, season with salt and black pepper to taste, until garlic is aromatic, 1-2 minutes.  Add in  your balsamic vinegar, and reduce slightly. 
5.  Plate asparagus and pour balsamic tomatoes and sauce over asparagus.   Sprinkle with feta cheese.


Want more recipes, food info, and pictures more often?  Then follow me on Facebook!  Click then link below to check out my Facebook page.
Brittany M on Facebook at: Cooking with Brittany

Tuesday, March 4, 2014

Bacon Jam


Everything is better with BACON!!  It's has to be, I think at this point it's probably a proven fact (if you can dip bacon in chocolate and it tastes good, its a fact).  Recently I had my Bacon class and my list of things I wanted to make with the participants was endless! 
 
Sautéed bacon, onions, and garlic.
 

There are just so many different things that one could and does do with bacon.  Unfortunately due to time, bacon jam just didn't make the list of things we could do in the two hour time frame.  But don't you worry, I just couldn't resist making this at home and trying it out. 
 

After transferring onion, garlic, and bacon to Dutch Oven and adding in the liquid ingredients.
 
First of all though what is Bacon Jam exactly.  I wouldn't say its a jam per say, but more so a "jam" in the sense that it has that consistency.  The best description I can give is that it's more like a reduction of sautéed bacon, onions and garlic and a few other liquid ingredients that are slowly cooked down.  The cooking concept is similar to how you might make an apple butter or pumpkin butter but because of the bacon in it, it will have a thicker, chunkier consistency like a jam.
 
After reducing for an 1 1/2 hours, the color has really deepened
 
After trying this when it was finished, it was just a tad on the sweet side for me, so I added in some cayenne pepper and next time with add in crushed red pepper flakes in the beginning with cooking the onions and garlic.
 

Bacon Jam
Ingredients:
1 pound bacon, cook and crumble into small pieces
6 cloves garlic, minced
1 tbsp. crushed red pepper flakes (optional)
1 onion, small dice
3 tbsp. brown sugar
1 tbsp. hot sauce (optional)
1 tsp. cayenne pepper
1 cup brewed coffee
1/4 cup apple  cider vinegar
1/4 cup maple syrup
Black pepper, to taste
Extra water

Directions:
1.  In a non stick pan, using the render fat from your cooked bacon sauté the onion, garlic and crushed red pepper flakes until the onions are translucent and the garlic is aromatic.
2.  Transfer the bacon, onion and garlic mixture into a Dutch Oven (or any other heavy based cast iron pot) and add the rest of the ingredients except for the water.
3.  Simmer for around two hours, adding 1/4 cup of water every 20 minutes or so (when your mixture has reduced down you are ready to add more water, the timing various) and stir.
4.  When the mixture is ready, let cool and then place in a food processor.  Pulse a few times, being sure to leave a little chunky so you still have some texture.  (Or keeping blending to the desired texture you would like.

Want more recipes, food info, and pictures more often?  Then follow me on Facebook!  Click then link below to check out my Facebook page.
Brittany M on Facebook at: Cooking with Brittany